Articles

Affichage des articles du 2021

Install raster, terra, sf or stars package in Ubuntu

To install difficult packages: raster, terra, sf or stars In terminal:  sudo apt-get install sqlite3 sudo add-apt-repository ppa:ubuntugis/ppa && sudo apt-get update  Install gdal using:  sudo apt install libgdal-dev sudo apt-get install libproj-dev sudo updatedb locate libproj.so (copy the link of the file libproj.so) sudo ln -s (the link) /usr/lib/libproj.so Install libgeos: https://www.blogger.com/blog/post/edit/2061052160425746363/1945424748660662138 and sudo R install.packages("raster") install.packages("rgeos") install.packages("rgdal") install.packages("terra") install.packages("sf") install.packages("stars")

Fit a mixture of normal and lognormal distribution

Image
x.1 <-rnorm(6000, 2.4, 0.6)  x.2 <-rlnorm(10000, 1.3,0.1)    X <-c(x.1, x.2)  hist(X,100,freq=FALSE, ylim=c(0,1.5))  lines(density(x.1), lty=2, lwd=2)  lines(density(x.2), lty=2, lwd=2)  lines(density(X), lty=4)    fitnormlnorm <-function(par, val) {    p  <- 1/(1+exp(-par[5]))    return(-sum(log(p*dnorm(val, par[1], abs(par[2]), log = FALSE)+                      (1-p)*dlnorm(val, par[3], abs(par[4]), log = FALSE))))  }    # Mean 1  m1=2.3; s1=0.5  # Mean 2  m2=1.3; s2=0.1  # proportion of 1 - logit transform  p=0    par <-c(m1, s1, m2, s2, p)    result2 <-optim(par, fitnormlnorm, method="BFGS", val=X,                  hessian=FALSE, control=list(trace=1))    lines(seq(from=0, to=5, length=100),         dnorm(...

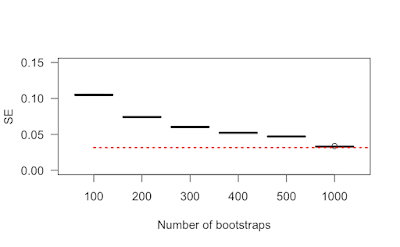
Example of bootstrap to estimate se of a set of data... just for fun

Image
N <- 1000 A <- rnorm(N) sd(A)/sqrt(N) # Vraie valeur:  1/sqrt(N) t <- NULL for (rep in rep(c(100, 200, 300, 400, 500, 1000), 10)) {   print(rep)   s <- NULL   for (i in 1:10000) {     tirage <- sample(A, size=rep, replace = TRUE)     s <- c(s, mean(tirage))   }      t <- c(t, sd(s)) } dta <- data.frame(group=rep(c(100, 200, 300, 400, 500, 1000), 10),                    mean=t) boxplot(mean ~ group, data=dta, las=1, ylab="SE", xlab="Number of bootstraps", ylim=c(0, 0.15)) segments(x0=1, x1=7, y0=1/sqrt(N), y1=1/sqrt(N), col="red", lty=3, lwd=2) In red, the true SE. The SE estimation by bootstrap is upper biased.

Get versions of R, Rstudio, shiny or packages

  The version of Rstudio can be obtained using: RStudio.Version() The running version of R is obtained by: R.version In terminal, the installed R version is obtained by: √ ~ % R --version  R version 4.3.2 (2023-10-31) -- "Eye Holes" Copyright (C) 2023 The R Foundation for Statistical Computing Platform: x86_64-pc-linux-gnu (64-bit) R is free software and comes with ABSOLUTELY NO WARRANTY. You are welcome to redistribute it under the terms of the GNU General Public License versions 2 or 3. For more information about these matters see https://www.gnu.org/licenses/. To get a package version: packageVersion(_Package name_) Other information can be found here: .libPaths() sessionInfo() For Shiny: Whitin R: system('shiny-server --version', intern = TRUE) In terminal: shiny-server --version

phantom text in graphics

Image
  The title function allows you to change the color of the text using the col argument, but that color is applied to the entire text string -- there's no obvious way to set the color of individual words. Or is there?  Barry Rowlingson offers an  elegant solution  that uses the "overhead transparency" principle of R graphics: you can overlay additional graphical elements one atop another, to build up your graph layer by layer.  So you could add the title  Hair color  in red on the left, and  Eye color  in blue on the right, and put a black "and" in the middle.  The trick is in the positioning -- it could take a lot of trial and error to get the  x  position of each element correct.  But if you plot the same text three times in three different colors, but leave some words blank (so they won't overlay previously plotted elements) you don't have to worry about positioning at all.  The  phantom  notation allows y...

Force system messages to be in English

 > warning("Essai") Message d'avis : Essai  > Sys.setenv(LANG = "en") > warning("Essai") Warning message: Essai 

Distribution when only quantiles are known

Imagine that you have a credible interval (0.01, 0.3) for (0.025, 0.975) probabilities for one proportion value and you would like to use this variable. The solution is to search for the beta distribution that gives this credible interval: library("HelpersMG") best <- fitdistrquantiles(quantiles = c(0.01, 0.3), probs=c(0.025, 0.975), scaled=FALSE, distribution = "beta") Then it is possible to try the result: rd10000 <- rbeta(10000, shape1 = best["shape1"], shape2 = best["shape2"]) quantile(rd10000, probs=c(0.025, 0.975)) It works ! This function can fit also more than 2 quantiles and can be used for gamma and normal distributions. Now let do a simple exercise Let p and q two independent proportions being known only from their confidence interval and median: p <- c("2.5%"=0.012, "50%"=0.14, "97.5%"=0.25) q <-  c("2.5%"=0.37, "50%"=0.52, "97.5%"=0.75) I want the confidence inte...

utf8 code

 http://www.ltg.ed.ac.uk/~richard/utf-8.cgi Choose Character, enter the characters to convert in the text box; Example •, will give you: Character • Character name BULLET Hex code point 2022 Decimal code point 8226 Hex UTF-8 bytes E2 80 A2  Octal UTF-8 bytes 342 200 242  UTF-8 bytes as Latin-1 characters bytes â <80> ¢ Then: x <- "\u2022" print(x) [1] "•"

Angle of line linking two points

 Let center.x and center.y be the center of the Cartesian plan. Let x1 and y1 be the coordinate of the point. The angle between (center.x, center.y) and (x1, y1) is: (atan((y1-center.y)/(x1-center.x))+pi*(as.numeric((x1-center.x)<0))) %% (2*pi) The 0 is at right of the center, pi is at left, pi/2 at the top and 3 pi/2 at the bottom.

Convert a matrix to vector and back

  You must use byrow = FALSE (the default) to convert the vector back to a matrix. > (d <- matrix(1:6, nrow=2, ncol=3))      [,1] [,2] [,3] [1,]    1    3    5 [2,]    2    4    6 > (v <- as.vector(d)) [1] 1 2 3 4 5 6 > matrix(v, nrow=2, ncol=3, byrow = FALSE)      [,1] [,2] [,3] [1,]    1    3    5 [2,]    2    4    6

An example of barplot with ggplot2

  From R-help discussion list; answer by Rui Barradas. I like this answer and I copy it here: h <- c(574,557,544,535,534,532,531,527,526,525,         524,520,518,512,507,504,504,489,488,488,         487,484,484,474,472,455,444,420)  nms <- c("Fribourg(f)","Valais(d)","Appenzell Rhodes Intérieures",           "Fribourg(d)","Jura","Schwyz","Schaffhouse","Berne(f)",           "Thurgovie","Valais(f)","Argovie","Appenzell Rhodes Extérieures",           "Genève","Zoug","Tessin","Neuchâtel","Vaud","Uri","Nidwald",           "Berne(d)","Zurich","Obwald","Saint-Gall","Soleure","Lucerne",           "Glaris","Bâle-Campagne","Bâle-Ville")  nms <- factor(nms, levels = nms)  library...

Check datasets in package with utf-8, latin1 or bytes characters

Here is a hack of tools:::.check_package_datasets() to show what dataset has utf-8, latin1 or bytes characters. pkgDir must be the path of the package.   check_package_datasets <- function (pkgDir)    {     oLC_ct <- Sys.getlocale("LC_CTYPE")     on.exit(Sys.setlocale("LC_CTYPE", oLC_ct))     Sys.setlocale("LC_CTYPE", "C")     oop <- options(warn = -1)     on.exit(options(oop), add = TRUE)     check_one <- function(x, ds) {       if (!length(x))          return()       if (is.list(x))          lapply(unclass(x), check_one, ds = ds)       if (is.character(x)) {         xx <- unclass(x)         enc <- Encoding(xx)         latin1 <<- latin1 + sum(enc == "latin1")         utf8 <<- utf8 + sum(enc == "UTF-8")   ...

RcppArmadillo version 0.10.6.0.0 in MacOS X 11.5

Prevent error in install RcppArmadillo version 0.10.6.0.0 First install gcc with macbrew  First install homebrew, using in terminal: /usr/bin/ruby -e "$(curl -fsSL https://raw.githubusercontent.com/Homebrew/install/master/install)" Then install llvm brew install --with-clang llvm In /usr/local/opt/gcc, there is a symlink to the last gcc version installed by homebrew. then, in terminal, do: sudo mkdir /usr/local/gfortran/ sudo ln -s /usr/local/opt/gcc/lib/gcc/11 /usr/local/gfortran/lib sudo mkdir /usr/local/gfortran/lib/gcc/x86_64-apple-darwin18/ sudo ln -s /usr/local/opt/gcc/lib/gcc/11 /usr/local/gfortran/lib/gcc/x86_64-apple-darwin18/8.2.0 And in R: install.packages("RcppArmadillo")

Store and get variables by their names from a list

 a1 <- "10" a2 <- NULL a3 <- 1:10 # To store variables in a named list px <- mget(x=c("a1", "a2", "a3")) # To extract variables from a named list np <- names(px) invisible(lapply(seq_along(np), FUN = function(x) assign(np[x], px[[x]], envir = .GlobalEnv)))                

AICc or AIC for binomial model with splited or grouped data

As shown in a previous plot, the two ways to use binomial data (grouped by independent variable or splited for each individual) produced two different estimations of R2 or Nagelkerke R2: https://biostatsr.blogspot.com/2021/06/nagelkerke-r2-for-binomial-data-is.html Let try if the problem occurs with AIC and AICc: Grouped data: n <- c(3, 4, 5, 2, 2) data_grouped <- data.frame(x=n, y=5-n) cof_grouped <- c(10, 7, 2, 3, 4) res_grouped <- glm(cbind(x,y) ~ cof_grouped, data=data_grouped, family=binomial()) cof_grouped2 <- c(9, 7, 2, 3, 4) res_grouped2 <- glm(cbind(x,y) ~ cof_grouped2, data=data_grouped, family=binomial()) library(AICcmodavg) # or library(MuMIn) AIC(res_grouped2)-AIC(res_grouped) AICc(res_grouped2)-AICc(res_grouped) Splited data: n <- c(3, 4, 5, 2, 2) data_splited <- data.frame(x=unlist(lapply(n,                                             ...

R2 for binomial data is sensitive on the grouping scheme

 Try to use these data to calculate Nagelkerke R2: library(fmsb) data_grouped <- data.frame(x=c(3, 4, 5), y=c(2, 1, 0)) cof_grouped <- c(10, 7, 2) res_grouped <- glm(cbind(x,y) ~ cof_grouped, data=data_grouped, family=binomial()) summary(res_grouped) or data_splited <- data.frame(x=c(1, 1, 1, 0, 0, 1, 1, 1, 1, 0, 1, 1, 1, 1, 1),                             y=1-c(1, 1, 1, 0, 0, 1, 1, 1, 1, 0, 1, 1, 1, 1, 1)) cof_splited <- rep(c(10, 7, 2), each=5) res_splited <- glm(cbind(x,y) ~ cof_splited, data=data_splited, family=binomial()) summary(res_splited) These data are exactly the same and indeed the fitted model is the same. But... > NagelkerkeR2(res_grouped)$R2 [1] 0.9538362 > NagelkerkeR2(res_splited)$R2 [1] 0.2879462 You will conclude for a very strong link and a weaker link in the second case. Note that you have the same problem with a common R2: > cor(x = data_grouped$x/(data_...

Nagelkerke R2 with different packages gives different values

 Let try different packages to estimate Nagelkerke (1991) R^2. Nagelkerke NJD (1991) A note on a general definition of the coefficient of determination. Biometrika 78:691-192 nagelkerke() function from package companion truncates the significance digits at 6. NagelkerkeR2() from package fmsb reports a different value as compare to other functions in the first example. I don't know why. I have contacted the author of the package and he does not know also. install.packages("https://hebergement.universite-paris-saclay.fr/marcgirondot/CRAN/HelpersMG.tar.gz", repos=NULL, type="source") library(HelpersMG) library(rcompanion) library(fmsb) res <- glm(cbind(ncases,ncontrols) ~ agegp+alcgp+tobgp, data=esoph, family=binomial()) NagelkerkeR2(res)$R2 # [1] 0.9759681 nagelkerke(res)$Pseudo.R.squared.for.model.vs.null["Nagelkerke (Cragg and Uhler)", "Pseudo.R.squared"] # [1] 0.965045 NagelkerkeScaledR2(x=esoph$ncases, size = esoph$ncases+esoph$ncontrols...

Install ou update pkgdown in Ubuntu 20.04

In terminal: sudo apt-get install libfribidi-dev sudo apt-get install libharfbuzz-dev Then in R install.packages("pkgdown")

After update to R 4.1

# update indices sudo apt update -qq # install two helper packages we need sudo apt install --no-install-recommends software-properties-common dirmngr # import the signing key (by Michael Rutter) for these repo sudo apt-key adv --keyserver keyserver.ubuntu.com --recv-keys E298A3A825C0D65DFD57CBB651716619E084DAB9 # add the R 4.0 repo from CRAN -- adjust 'focal' to 'groovy' or 'bionic' as needed sudo add-apt-repository "deb https://cloud.r-project.org/bin/linux/ubuntu $(lsb_release -cs)-cran40/" Here we use lsb_release -cs to access which Ubuntu flavor you run: one of “hirsuite”, “groovy”, “focal”, “bionic”, … Then run sudo apt install --no-install-recommends r-base See:  https://cran.r-project.org/bin/linux/ubuntu/ pkgs <- as.data.frame(installed.packages(), stringsAsFactors = FALSE, row.names = FALSE) pkgs[, c("Package", "Version", "Built")] Will list the packages with their built version. Then you can do: update.packag...

install sf from GitHub source in MacOsX

In terminal. You must have MacBrew installed. If not, use: Install macbrew via: /bin/bash -c "$(curl -fsSL https://raw.githubusercontent.com/Homebrew/install/HEAD/install.sh)" Then brew install proj brew install gdal brew install geos sudo R Then in R: library("devtools") install_github("r-spatial/sf", build_opts = c("--with-proj-include=/usr/local/include",                                                "--with-proj-lib=/usr/local/lib"), force=TRUE) And... > packageVersion("sf") [1] ‘0.9.9’

Install treemix in ubuntu 20.04

Informations are available here  https://bitbucket.org/nygcresearch/treemix/downloads/ In terminal, enter for  Ubuntu 20.04: wget https://bitbucket.org/nygcresearch/treemix/downloads/treemix-1.13.tar.gz tar -xvf treemix-1.13.tar.gz sudo apt-get install libgsl-dev sudo apt install libboost-dev sudo apt install libboost-all-dev cd treemix-1.13/ ./configure make sudo make install And it works: $ treemix TreeMix v. 1.13 $Revision: 231 $ Options: -h display this help -i [file name] input file -o [stem] output stem (will be [stem].treeout.gz, [stem].cov.gz, [stem].modelcov.gz) -k [int] number of SNPs per block for estimation of covariance matrix (1) -global Do a round of global rearrangements after adding all populations -tf [file name] Read the tree topology from a file, rather than estimating it -m [int] number of migration edges to add (0) -root [string] comma-delimited list of populations to set on one side of the root (for migration) -g [vertices file name] [edges file na...

Density of beta distribution

The density of beta distribution in R is obtained by: dbeta(x, shape1, shape2, ncp = 0, log = FALSE) Arguments x      vector of quantiles shape1, shape2      non-negative parameters of the Beta distribution. In package HelpersMG, I propose the  dbeta_new(x, mu = NULL, v = NULL, shape1, shape2, ncp = 0, log = FALSE) with mu being the mean and variance being v To obtain a uniform distribution with mu and v, use: mu=0.5 and v=1/12 or shape1=1 and shape2=1

POSIXct or POSIXlt

POSIXct are easier to work with as data (e.g. a column in a dataframe). POSIXlt is easier to work with as dates & times, and has a bigger range. To remember which one is doing what: lt is for list. 'ct' is great for representing date/time holistically (2021-04-26 13:21:27) and is numeric under the hood in seconds since the big bang (just kidding), kind of like julian seconds. [note that "Julian seconds" is misleading. It should be rather ordinal seconds] 'lt' is a list of 7 elements that often require manipulation (e.g. lt$mon = month of the year starting with Jan = 0) but it's great for extracting values like day of the year, day of the week, etc. w/o having to do it yourself - saves a heap of error-fraught coding. One draw back is the handling of daylight savings shifts. In March, an hour gets lost (jumps from 0159 to 0300) and in October you get an hour twice, so if you're using code that requires 1 hour steps, you get hiccups twice/year, so tha...

R stuck during S3 registration check

This worked for me to apparently fix my system: Start with a newly rebooted system. Uninstall XQuartz by dragging it to the trash. Look in /Library/LaunchAgents/ for filenames related to xquartz.  Delete them. Look in /Library/LaunchDaemons/ for similar files.  Delete them. Reboot the system again, and install XQuartz again. Relogin, and things seem fine. ______ Sometimes, just reinstalling XQuartz is sufficient. https://www.xquartz.org

Install plumber server

This is intended for a Ubuntu 20.04 server: sudo apt-get install git-core libssl-dev libcurl4-gnutls-dev curl libsodium-dev libxml2-dev sudo R install.packages("plumber") q("no") mkdir plumberapp cd plumberapp vi plumber.R ## Copy these lines # plumber.R #* Echo back the input #* @param msg The message to echo #* @get /echo function(msg="") {   list(msg = paste0("The message is: '", msg, "'")) } ## End vi myapi.R ## Copy these lines r <- plumber::plumb("/home/mgirond/plumberapp/plumber.R") r$run(host="0.0.0.0", port=8000) ## End vi my-api.service ## Copy these lines [Unit] Description=plumber service [Service] ExecStart=/usr/bin/Rscript /home/mgirond/plumberapp/myapi.R [Install] WantedBy=multi-user.target ## End sudo ufw allow 8000/tcp cp my-api.service /etc/systemd/system/my-api.service systemctl start my-api systemctl enable my-api sudo reboot Then it is possible to test the API: curl "http://localh...

open the working directory as a window in finder

Simply enter: system(command=sprintf('open %s', shQuote(getwd()))) It has been introduced in HepersMG package > 4.5-1 as the function openwd() https://CRAN.R-project.org/package=HelpersMG   install.packages("https://hebergement.universite-paris-saclay.fr/marcgirondot/CRAN/HelpersMG.tar.gz", repos=NULL, type="source") library(HelpersMG) openwd() It should work also for windows with  shell.exec(getwd())

Reset "par" with defaut values

Enter in R or Rstudio and do: dput(par(no.readonly = TRUE)) Copy the list() that is shown, for example for me: list(xlog = FALSE, ylog = FALSE, adj = 0.5, ann = TRUE, ask = FALSE,     bg = "white", bty = "o", cex = 1, cex.axis = 1, cex.lab = 1,     cex.main = 1.2, cex.sub = 1, col = "black", col.axis = "black",     col.lab = "black", col.main = "black", col.sub = "black",     crt = 0, err = 0L, family = "", fg = "black", fig = c(0,     1, 0, 1), fin = c(9.47674418604651, 8.72093023255814), font = 1L,     font.axis = 1L, font.lab = 1L, font.main = 2L, font.sub = 1L,     lab = c(5L, 5L, 7L), las = 0L, lend = "round", lheight = 1,     ljoin = "round", lmitre = 10, lty = "solid", lwd = 1, mai = c(1.02,     0.82, 0.82, 0.42), mar = c(5.1, 4.1, 4.1, 2.1), mex = 1,     mfcol = c(1L, 1L), mfg = c(1L, 1L, 1L, 1L), mfrow = c(1L,     1L), mgp = c(3, 1, 0), mkh = 0.001, new = FAL...

Install tiff, ijtiff and jpeg packages in Ubuntu and MacOSX

In terminal, first install wget to download sources of the packages. Check the most recent sources in CRAN web site. brew install wget For tiff packages, in MacOSX, Intel computer  brew install libtiff sudo ln -s  /usr/local/include/tiff.h /Library/Frameworks/R.framework/Resources/include/ sudo ln -s /usr/local/include/tiffconf.h /Library/Frameworks/R.framework/Resources/include/ sudo ln -s /usr/local/include/tiffio.h /Library/Frameworks/R.framework/Resources/include/ sudo ln -s /usr/local/include/tiffvers.h /Library/Frameworks/R.framework/Resources/include/ sudo ln -s /usr/local/lib/libtiff* /Library/Frameworks/R.framework/Resources/lib/ cd $HOME wget https://cran.r-project.org/src/contrib/tiff_0.1-8.tar.gz R CMD INSTALL --configure-vars='INCLUDE_DIR=/usr/local/include LIB_DIR=/usr/local/lib' tiff_0.1-8.tar.gz rm tiff_0.1-8.tar.gz For ijtiff In R: install.packages(c("checkmate", "strex", "zeallot")) In terminal:  wget https://cran....